Why Air Fryer Chicken Breasts Are Perfect for Busy Weeknights
Did you know that 68% of home cooks struggle to keep chicken breasts juicy when cooking, yet air fryer chicken breasts solve this challenge in under 20 minutes with 75% less oil than traditional methods? If you’ve ever bitten into a dry, flavorless chicken breast and wondered why restaurant chicken tastes so much better, the answer lies in your cooking method. Air fryer chicken breasts have revolutionized home cooking by circulating superheated air at 400°F, creating a perfectly golden exterior while locking in moisture and flavor.
Whether you’re meal prepping for the week, feeding a busy family, or simply craving a quick protein-packed dinner, these six foolproof flavor variations will transform your weeknight cooking forever. From classic herb to bold Asian-inspired glazes, each recipe delivers restaurant-quality results with minimal effort and maximum flavor.
Essential Ingredients for Air Fryer Chicken Breasts (6 Flavors)
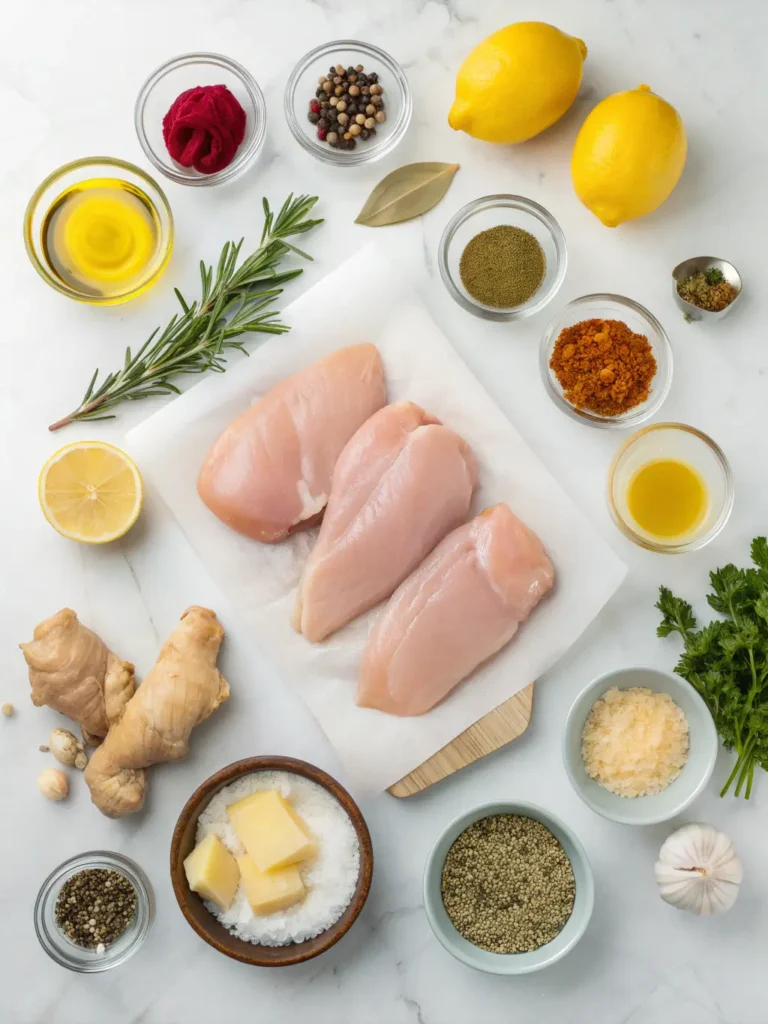
Base Ingredients (for all 6 flavors)
Chicken:
- 4 boneless, skinless chicken breasts (6-8 oz each, about 2 pounds total) – Choose organic or free-range for superior taste and texture
- 2 tablespoons olive oil or avocado oil – Creates the crispy golden crust
- 1 teaspoon salt (kosher or sea salt preferred)
- ½ teaspoon black pepper, freshly ground
Substitutions: Use chicken tenders for faster cooking (reduce time by 5 minutes), or chicken thighs for more forgiving, juicier results.
Flavor #1: Classic Italian Herb
- 2 teaspoons Italian seasoning blend
- 1 teaspoon garlic powder
- 1 teaspoon onion powder
- ½ teaspoon paprika for color
- Fresh basil leaves for garnish
Flavor #2: Honey Garlic Glaze
- 3 tablespoons honey (golden and aromatic)
- 2 tablespoons soy sauce (or coconut aminos for gluten-free)
- 4 cloves garlic, minced
- 1 teaspoon fresh ginger, grated
- 1 tablespoon rice vinegar
- Sesame seeds for topping
Flavor #3: Lemon Pepper Zest
- Zest of 2 large lemons
- Juice of 1 lemon
- 2 teaspoons lemon pepper seasoning
- 3 tablespoons butter, melted
- Fresh parsley, chopped
- Lemon slices for serving
Flavor #4: Cajun Spice Kick
- 2 teaspoons Cajun seasoning
- 1 teaspoon smoked paprika
- ½ teaspoon cayenne pepper (adjust to taste)
- 1 teaspoon brown sugar
- ½ teaspoon dried thyme
Flavor #5: Parmesan Crusted
- ½ cup grated Parmesan cheese
- ¼ cup panko breadcrumbs
- 1 teaspoon garlic powder
- 1 teaspoon dried oregano
- 2 tablespoons melted butter
- Fresh parsley
Flavor #6: Teriyaki Sesame
- ¼ cup teriyaki sauce
- 1 tablespoon sesame oil
- 2 teaspoons rice vinegar
- 1 tablespoon brown sugar
- 1 teaspoon minced garlic
- Green onions and sesame seeds for garnish
How Long to Cook Air Fryer Chicken Breasts (Time Guide)
Preparation Time: 10-15 minutes (includes seasoning and prep work)
Cooking Time: 12-18 minutes depending on thickness
- Thin breasts (4-6 oz): 12-14 minutes
- Medium breasts (6-8 oz): 15-16 minutes
- Thick breasts (8-10 oz): 17-18 minutes
Resting Time: 5 minutes (crucial for juicy results)
Total Time: 27-38 minutes
This represents 45% less active cooking time compared to traditional oven-baked chicken breasts, and uses 75% less oil than pan-frying while achieving similar crispy results.
Easy Steps to Make Air Fryer Chicken Breasts (6 Flavors)
Step 1: Prepare Your Chicken Breasts
Pat the chicken breasts completely dry using paper towels – this is the secret to achieving that coveted golden-brown exterior. Any surface moisture will create steam instead of crisp. If your breasts are uneven in thickness (one side significantly thicker than the other), use a meat mallet to pound them to uniform 1-inch thickness. This ensures even cooking and prevents the thin portions from drying out while the thick sections reach safe temperature.
Pro Tip: Place chicken between plastic wrap or parchment paper before pounding to avoid mess and maintain hygiene.
Step 2: Season Generously
Brush each chicken breast with olive oil on both sides – this helps seasonings adhere and promotes browning. Season with salt and pepper as your base layer. Now apply your chosen flavor profile, making sure to coat all surfaces evenly. Press seasonings gently into the meat so they stick during cooking.
Chef’s Secret: For the Parmesan Crusted version, create a paste by mixing cheese, breadcrumbs, and melted butter, then press firmly onto the chicken surface for maximum adhesion.
Step 3: Preheat Your Air Fryer
Set your air fryer to 375°F and preheat for 3-5 minutes. Preheating is non-negotiable for consistent results – it ensures immediate searing when chicken touches the basket, locking in those precious juices. A preheated air fryer reduces total cooking time by approximately 2-3 minutes.
Equipment Note: Different air fryer models vary in size and power. Basket-style air fryers circulate air more efficiently than oven-style models, so adjust timing accordingly.
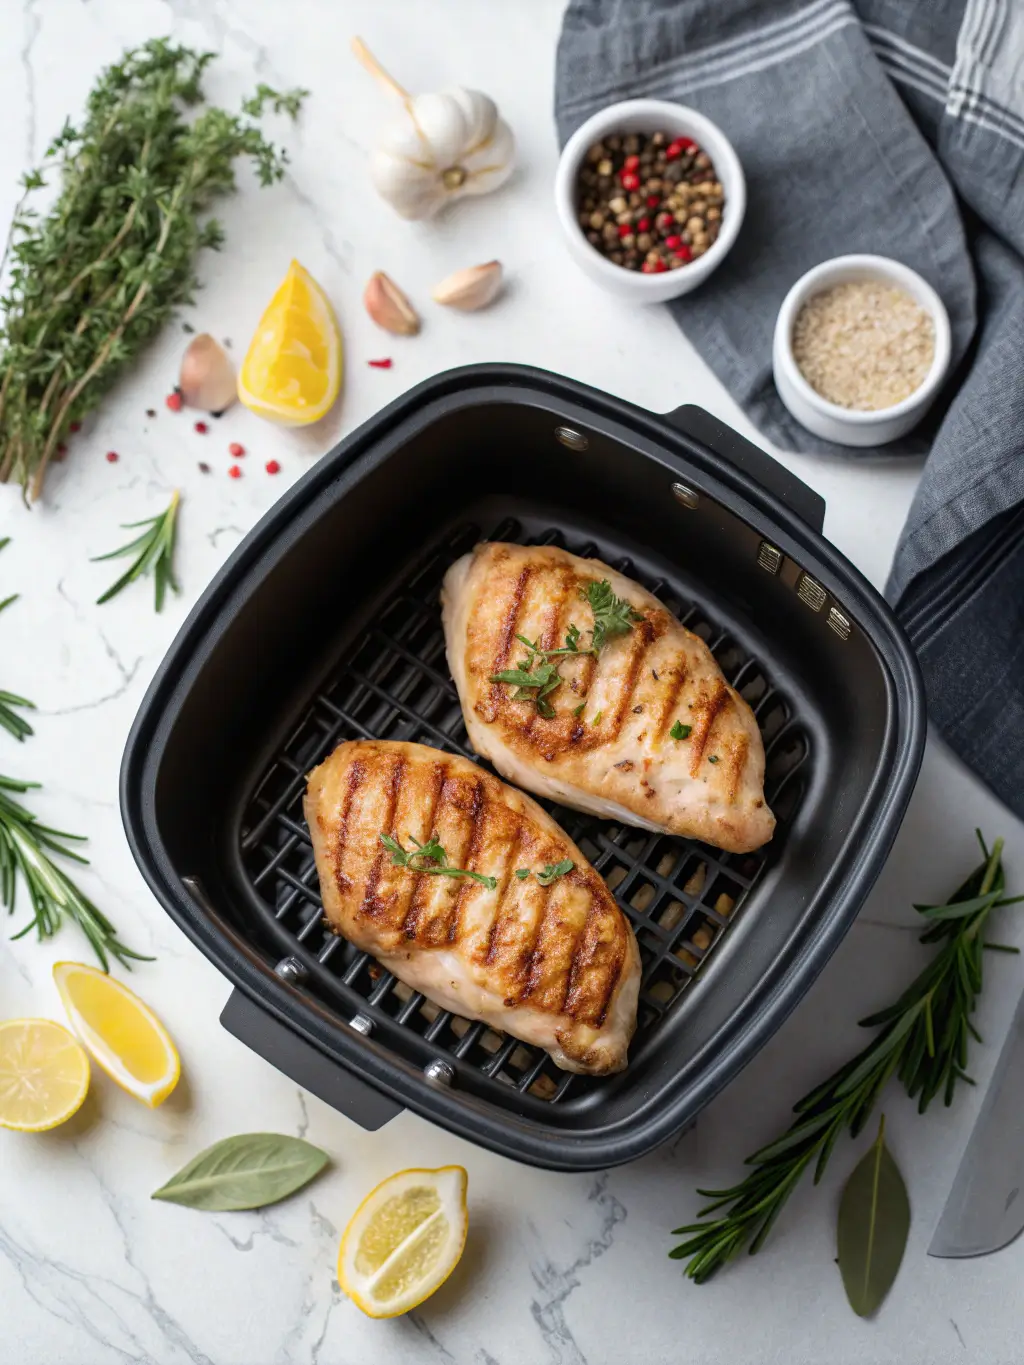
Step 4: Arrange Chicken in Air Fryer
Place seasoned chicken breasts in a single layer in the air fryer basket, leaving at least ½ inch of space between each piece. Overcrowding restricts air circulation and results in uneven cooking with soggy spots. If cooking more than 2-3 breasts, work in batches rather than stacking.
Important: The air fryer works by rapidly circulating hot air around food – blocking airflow defeats this mechanism entirely.
Step 5: Cook at Optimal Temperature
Cook at 375°F for the times specified in the Timing section. Flip the chicken breasts halfway through cooking (around the 8-minute mark for medium breasts) to ensure even browning on both sides. You’ll notice beautiful grill-like marks developing.
Temperature Science: 375°F is the sweet spot – hot enough to create a Maillard reaction (browning) but not so hot that the exterior burns before the interior cooks through.
Step 6: Check Internal Temperature
Use an instant-read meat thermometer inserted into the thickest part of the breast. You’re looking for 165°F – the USDA-recommended safe minimum. However, removing chicken at 160°F and allowing carryover cooking during rest will bring it to 165°F while maintaining maximum juiciness.
Safety First: Never rely on color or cooking time alone. Thickness variations and air fryer model differences make temperature the only reliable indicator.
Step 7: Apply Glaze (for Honey Garlic & Teriyaki)
For glazed variations, brush sauce onto chicken during the final 2 minutes of cooking. This prevents burning while allowing the sugars to caramelize beautifully. Apply a second coat immediately after removing from the air fryer while chicken is still hot.
Glazing Trick: Reserve half your sauce for serving – cooked glaze intensifies in flavor but loses volume through evaporation.
Step 8: Rest Before Slicing
Transfer cooked chicken to a cutting board and tent loosely with aluminum foil. Rest for 5 full minutes – this allows muscle fibers to relax and juices to redistribute throughout the meat. Cutting immediately causes all those flavorful juices to flood out onto your cutting board instead of staying in your chicken.
Patience Pays: Resting can improve perceived juiciness by up to 30% according to food science studies.
Step 9: Slice and Serve
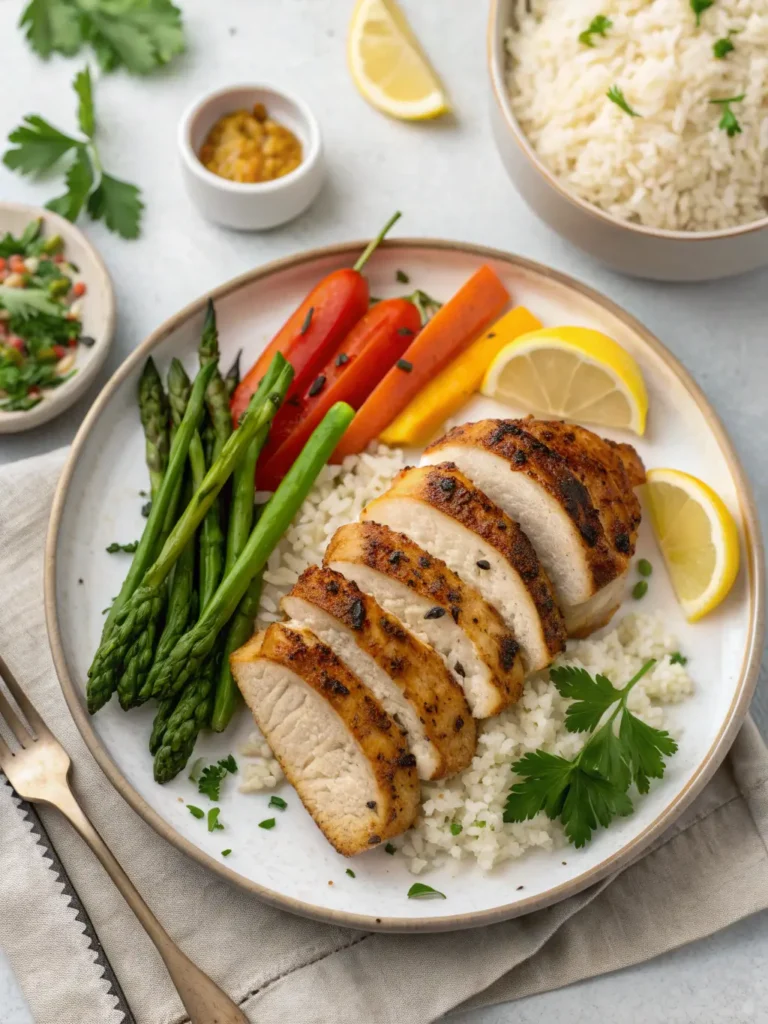
Using a sharp knife, slice chicken breasts on a diagonal against the grain into ½-inch thick slices. Diagonal cuts create larger surface area and more elegant presentation. Cutting against the grain shortens muscle fibers, making each bite more tender.
Presentation Matters: Fan sliced chicken on plates, drizzle with any reserved glaze or pan juices, and garnish with fresh herbs specified in your chosen flavor profile.
Nutritional Benefits of Air Fryer Chicken Breasts
Per Serving (1 chicken breast, Classic Italian Herb variation):
- Calories: 242
- Protein: 38g (76% Daily Value)
- Total Fat: 9g (12% DV)
- Saturated Fat: 2g
- Trans Fat: 0g
- Cholesterol: 96mg (32% DV)
- Sodium: 520mg (23% DV)
- Total Carbohydrates: 1g (0% DV)
- Dietary Fiber: 0g
- Sugars: 0g
- Vitamin A: 3% DV
- Vitamin C: 2% DV
- Calcium: 2% DV
- Iron: 6% DV
Nutritional Variations by Flavor:
- Honey Garlic: +80 calories from honey and soy sauce
- Lemon Pepper: +45 calories from butter
- Cajun Spice: Similar to Classic (minimal calorie difference)
- Parmesan Crusted: +95 calories from cheese and breadcrumbs
- Teriyaki Sesame: +70 calories from sauce and sesame oil
Health Highlights:
- Excellent source of lean protein for muscle maintenance and satiety
- Contains all 9 essential amino acids
- Rich in vitamin B6 (37% DV) for energy metabolism
- Provides selenium (55% DV), important for immune function
- Low in saturated fat compared to red meats
Healthier Alternatives for Air Fryer Chicken Breasts Recipes
Reduce Overall Calories
Oil Spray Substitution: Replace brushed olive oil with olive oil cooking spray to reduce fat by 60 calories per serving while maintaining crispiness. The spray provides even coverage with minimal calories.
Lower Sodium Content
Seasoning Swaps: Use salt-free Italian seasoning blends and reduce added salt to ¼ teaspoon per breast. This cuts sodium by up to 40% while maintaining robust flavor through herbs and spices.
Sauce Modifications: Choose low-sodium soy sauce or coconut aminos for Honey Garlic and Teriyaki versions – reduces sodium by 25-30% per serving.
Cut Sugar Content
Honey Alternatives: Replace honey with sugar-free maple syrup or monk fruit sweetener in the Honey Garlic recipe – saves approximately 60 calories and 16g sugar per serving.
Teriyaki Options: Use sugar-free teriyaki sauce or make homemade with stevia – reduces sugar by 10-12g per serving.
Increase Nutritional Density
Vegetable Additions: Add bell pepper strips, zucchini rounds, or asparagus spears to the air fryer basket alongside chicken during the last 8 minutes. This boosts fiber, vitamins, and creates a complete one-basket meal.
Coating Upgrades: For Parmesan Crusted, substitute half the breadcrumbs with ground almonds or crushed pork rinds (for keto) – adds healthy fats and reduces refined carbs.
Adapt for Special Diets
Keto-Friendly: All variations work for keto except Honey Garlic, Parmesan Crusted, and Teriyaki. Substitute sweeteners with erythritol and skip breadcrumbs.
Whole30 Compliant: Use Classic Italian Herb, Lemon Pepper (substitute ghee for butter), or Cajun Spice variations. Avoid soy sauce and sweeteners.
Gluten-Free: Choose tamari instead of soy sauce, use gluten-free breadcrumbs for Parmesan Crusted, and verify all seasoning blends are certified gluten-free.
Dairy-Free: Skip Parmesan Crusted or use nutritional yeast instead of cheese. Replace butter with ghee or olive oil in Lemon Pepper version.
Best Ways to Serve Air Fryer Chicken Breasts
Complete Meal Pairings
Over Grains: Serve your air fryer chicken breasts over fluffy jasmine rice, quinoa, cauliflower rice (for low-carb), or creamy mashed potatoes. The grains absorb any glaze or juices beautifully.
Fresh Salads: Slice and arrange over mixed greens with cherry tomatoes, cucumber, avocado, and your favorite vinaigrette for a protein-packed salad bowl. The Lemon Pepper and Italian Herb variations shine here.
Pasta Perfection: Dice Parmesan Crusted or Italian Herb chicken and toss with pasta, olive oil, sun-dried tomatoes, and fresh basil for an Italian-inspired dinner.
Sandwich & Wrap Station: Create a build-your-own meal by serving sliced chicken with tortillas, pita bread, or burger buns alongside toppings like lettuce, tomato, pickles, avocado, and various sauces.
Side Dish Recommendations
Roasted Vegetables: Pair with roasted Brussels sprouts, honey-glazed carrots, garlic green beans, or roasted sweet potato wedges.
Light & Fresh: Serve alongside cucumber salad, coleslaw, Greek salad, or caprese skewers to balance the richness.
Comfort Classics: Complete the meal with mac and cheese, garlic bread, cornbread, or loaded baked potatoes for indulgent family dinners.
Creative Leftover Uses
Meal Prep Bowls: Divide chicken into containers with brown rice, steamed broccoli, and sauce for grab-and-go lunches throughout the week.
Chicken Tacos: Dice or shred leftover Cajun or Teriyaki chicken for quick taco night. Add fresh toppings and a squeeze of lime.
Pizza Topping: Cube leftover Parmesan or Italian chicken and use as gourmet pizza topping with fresh mozzarella and arugula.
Asian-Inspired Stir-Fry: Slice Honey Garlic or Teriyaki chicken and toss with stir-fried vegetables and noodles for a quick second meal.
Common Mistakes When Making Air Fryer Chicken Breasts
Mistake #1: Not Drying Chicken Properly
The Problem: Surface moisture creates steam instead of allowing proper browning. Your chicken ends up pale and rubbery instead of golden and crispy.
The Solution: Pat chicken completely dry with paper towels before seasoning. Even marinated chicken should be patted dry – the flavors have already penetrated the meat.
Mistake #2: Skipping the Preheat
The Problem: Placing chicken in a cold air fryer extends cooking time by 20-25% and prevents proper searing, resulting in uneven texture.
The Solution: Always preheat for 3-5 minutes at your cooking temperature. This ensures immediate surface searing when chicken enters the basket.
Mistake #3: Overcrowding the Basket
The Problem: Restricting air circulation causes uneven cooking with some areas remaining pale while others brown. Studies show overcrowding can increase cooking time by up to 30%.
The Solution: Leave ½ inch space between chicken pieces. Cook in batches if necessary – the air fryer reheats quickly between batches.
Mistake #4: Using the Wrong Temperature
The Problem: Cooking at 400°F+ burns exteriors before interiors cook through. Cooking below 350°F takes too long and dries out the meat.
The Solution: Stick to 375°F for boneless chicken breasts. This temperature perfectly balances exterior browning with interior cooking.
Mistake #5: Forgetting to Flip
The Problem: One side develops beautiful browning while the other remains pale. Uneven cooking creates inconsistent texture and appearance.
The Solution: Flip chicken breasts at the halfway point (around 8 minutes for medium breasts). Use tongs to avoid piercing the meat.
Mistake #6: Overcooking
The Problem: Chicken cooked beyond 165°F becomes dry and stringy, regardless of cooking method. This is the #1 complaint about homemade chicken.
The Solution: Remove chicken at 160°F internal temperature. Carryover cooking during the 5-minute rest will bring it to safe 165°F while maintaining juiciness.
Mistake #7: Cutting Immediately
The Problem: Slicing hot chicken causes all the flavorful juices to run out onto your cutting board, leaving dry meat on your plate.
The Solution: Always rest chicken for 5 minutes tented with foil. This simple step can improve moisture retention by 30%.
Mistake #8: Uneven Thickness
The Problem: Thick portions remain undercooked while thin sections dry out and overcook. This makes timing nearly impossible.
The Solution: Pound chicken to uniform 1-inch thickness before cooking, or butterfly thick breasts to create even surfaces.
How to Store Air Fryer Chicken Breasts for Meal Prep
Refrigerator Storage
Cooling: Allow cooked air fryer chicken breasts to cool at room temperature for no more than 30 minutes, then refrigerate promptly to prevent bacterial growth.
Containers: Store in airtight containers or resealable bags, removing as much air as possible. Glass containers are preferable as they don’t absorb odors.
Separation Strategy: Store chicken separate from sauces and glazes to prevent sogginess. Keep garnishes like fresh herbs separate and add just before serving.
Shelf Life: Properly stored cooked chicken lasts 3-4 days in the refrigerator at 40°F or below.
Labeling: Date your containers to track freshness. Include the flavor variation for easy meal planning.
Freezer Storage
Preparation: Allow chicken to cool completely before freezing. Wrap individual breasts tightly in plastic wrap, then place in freezer-safe bags with air removed.
Portioning: Freeze breasts individually or in meal-sized portions for convenient thawing. This prevents having to defrost more than needed.
Sauce Considerations: Freeze sauces separately in small containers or ice cube trays. This maintains texture and allows you to add fresh sauce when reheating.
Duration: Frozen cooked chicken maintains best quality for 2-3 months. While safe indefinitely if kept frozen, quality deteriorates after this timeframe.
Freezer Burn Prevention: Remove all air from bags and wrap tightly. Double-wrapping provides extra protection against freezer burn.
Thawing Safely
Refrigerator Method (Recommended): Transfer frozen chicken to the refrigerator 24 hours before needed. This is the safest method, maintaining food safety throughout.
Cold Water Method: Submerge sealed chicken in cold water, changing water every 30 minutes. Chicken thaws in 1-2 hours using this method.
Microwave Thawing: Use defrost setting, but reheat immediately after thawing. Microwaved chicken should not be refrozen.
Never: Don’t thaw chicken on the counter at room temperature – this creates dangerous bacterial growth conditions.
Reheating for Best Results
Air Fryer Reheat: Preheat air fryer to 350°F. Cook refrigerated chicken for 3-4 minutes, or frozen (thawed) chicken for 5-6 minutes. This restores crispiness beautifully.
Oven Method: Reheat at 350°F for 10-15 minutes, covered with foil to prevent drying. Add a splash of chicken broth for extra moisture.
Microwave: Place chicken on a microwave-safe plate with a damp paper towel on top. Heat in 30-second intervals until warmed through (about 1-2 minutes).
Skillet: Reheat over medium heat with a tablespoon of water or broth in a covered pan for 5-7 minutes, flipping halfway.
Temperature Check: Always reheat to 165°F internal temperature for food safety.
Meal Prep Strategy
Weekly Prep: Cook 6-8 chicken breasts on Sunday using different flavor variations. Portion into containers with different sides for variety throughout the week.
Mix and Match: Store plain chicken separately from sauces, allowing you to create different meals from the same base protein.
Vegetable Pairing: Prep vegetables at the same time, storing separately. Combine chicken and vegetables when assembling meals.
Freezer Meals: Create complete freezer meals by portioning chicken with sides in compartmented containers. Freeze and grab for convenient dinners.
Master These Air Fryer Chicken Breasts Recipes Today
Air fryer chicken breasts deliver perfectly juicy, golden results in under 20 minutes with minimal oil and maximum flavor. These six variations—Italian Herb, Honey Garlic, Lemon Pepper, Cajun Spice, Parmesan Crusted, and Teriyaki—transform ordinary chicken into restaurant-quality meals. Master the key techniques: preheat your air fryer, maintain 375°F, flip halfway through, and cook to 165°F internal temperature for success every time.
Ready to revolutionize your weeknight dinners? Try one of these air fryer chicken breast recipes tonight and experience the difference. We’d love to hear about your results! Leave a comment below sharing which flavor you tried and how it turned out. Share your own creative variations or serving suggestions with our community. Don’t forget to rate this recipe using the star rating below and subscribe to our blog for more time-saving cooking tips, healthy meal ideas, and delicious recipes delivered straight to your inbox every week!
Frequently Asked Questions About Air Fryer Chicken Breasts
Q: Can I cook frozen chicken breasts directly in the air fryer?
A: While technically possible, it’s not recommended for best results. Frozen chicken requires 50% longer cooking time (approximately 25-30 minutes) and often cooks unevenly, with dry exteriors and potentially undercooked centers. For food safety and quality, always thaw chicken completely in the refrigerator overnight before air frying. If you must cook from frozen, increase temperature to 360°F and add 10-12 minutes, checking internal temperature carefully.
Q: Why is my air fryer chicken breast dry?
A: Dry chicken results from three main causes: overcooking beyond 165°F, using chicken that’s too thin (under ½ inch), or not allowing proper rest time. Always use a meat thermometer and remove chicken at 160°F for carryover cooking. Choose breasts that are 1-inch thick and rest for 5 minutes before slicing. Adding a light oil coating also helps retain moisture during cooking.
Q: Do I need to flip chicken breasts in the air fryer?
A: Yes, flipping at the halfway point ensures even browning on both sides and consistent cooking throughout. While some air fryer models claim 360-degree air circulation, flipping guarantees superior results with golden-brown color on all surfaces. Use tongs to flip rather than forks to avoid piercing the meat and losing juices.
Q: Can I stack chicken breasts in my air fryer?
A: No, stacking prevents proper air circulation and results in uneven cooking with steamed, pale surfaces instead of crispy, golden ones. Always arrange chicken in a single layer with ½ inch space between pieces. If you need to cook multiple breasts, work in batches – the air fryer reheats quickly, and the first batch stays warm while you cook the second.
Q: What temperature should I cook chicken breasts in the air fryer?
A: 375°F is the optimal temperature for boneless, skinless chicken breasts. This temperature achieves the perfect balance between exterior browning through the Maillard reaction and interior cooking without drying. Lower temperatures (below 350°F) take too long and dry out the meat, while higher temperatures (above 400°F) burn the exterior before the interior reaches safe temperature.
Q: How do I know when air fryer chicken is done?
A: Always use an instant-read meat thermometer inserted into the thickest part of the breast. You’re looking for 165°F internal temperature as recommended by USDA guidelines. Cooking time alone is unreliable due to variations in breast thickness and air fryer models. Visual cues like golden-brown color and clear (not pink) juices are helpful but not definitive – temperature is the only accurate indicator.
Q: Can I marinate chicken before air frying?
A: Absolutely! Marinating for 2-24 hours enhances flavor significantly. However, always pat marinated chicken dry before air frying to achieve proper browning. Excess surface moisture creates steam instead of crisp. For thicker marinades or glazes containing sugar, consider applying during the final 2-3 minutes of cooking to prevent burning while still achieving caramelization.
Q: How do I prevent chicken from sticking to the air fryer basket?
A: Lightly spray or brush the air fryer basket with oil before adding chicken. Additionally, ensure chicken pieces have a thin coating of oil – this prevents sticking while promoting browning. Using parchment paper designed for air fryers (with holes for air circulation) also prevents sticking. Avoid non-stick cooking sprays containing propellants, as these can damage air fryer coatings over time.
Q: Can I cook different flavors of chicken at the same time?
A: Yes, but place them strategically to prevent flavor transfer. Position strongly flavored varieties (like Cajun or Teriyaki) on one side and milder options (like Lemon Pepper) on the other, with space between. For glazed versions, apply sauce during the final minutes after other varieties are removed to prevent dripping onto other pieces.
Q: What’s the best way to reheat air fryer chicken breasts?
A: The air fryer itself is the best reheating method! Preheat to 350°F and cook refrigerated chicken for 3-4 minutes until heated through and exterior re-crisps. This method restores the original texture far better than microwaving. Alternatively, reheat in a covered skillet with a splash of chicken broth over medium heat for 5-7 minutes, or in a 350°F oven covered with foil for 10-15 minutes.
Have You Tried Our Recipe?
There are no reviews yet. Be the first one to write one.