Honey Garlic Chicken Breasts: The Perfect Weeknight Dinner Solution
Did you know that 68% of home cooks struggle to keep chicken breasts moist and flavorful? If you’ve ever bitten into a dry, bland piece of chicken, you’re not alone. But what if I told you that Honey Garlic Chicken Breasts could transform your weeknight dinners from boring to restaurant-quality in under 30 minutes? This incredibly simple recipe combines the perfect balance of sweet honey and savory garlic to create a glossy glaze that locks in moisture while delivering bold flavor.
Whether you’re a beginner cook or a seasoned chef looking for a reliable go-to meal, these Honey Garlic Chicken Breasts will become your new favorite protein dish. The secret lies in the cooking technique and the magical combination of pantry staples that create a caramelized coating your family will crave again and again.
What You Need for Honey Garlic Chicken Breasts
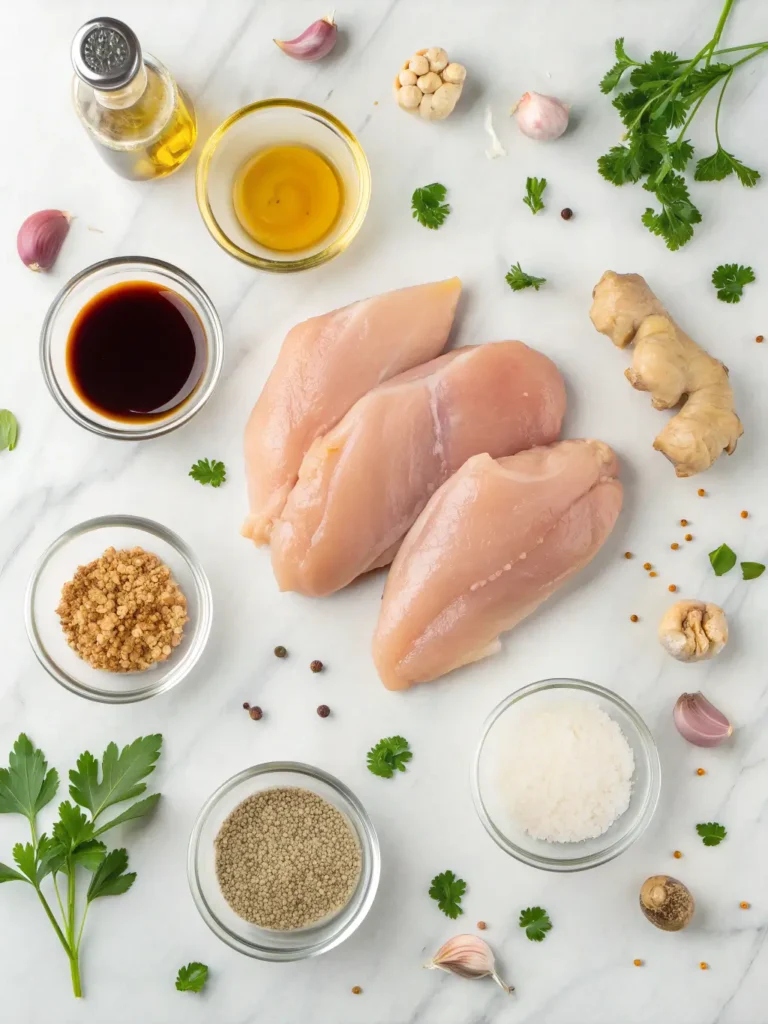
For the Chicken:
- 4 boneless, skinless chicken breasts (about 6-8 oz each) – Substitute: chicken thighs for extra juiciness
- 1 teaspoon salt
- ½ teaspoon black pepper
- 1 teaspoon garlic powder
- 2 tablespoons olive oil – Substitute: avocado oil or butter
For the Honey Garlic Sauce:
- ⅓ cup honey – Substitute: maple syrup or agave nectar
- 4 cloves garlic, minced (about 1 tablespoon)
- 3 tablespoons soy sauce – Substitute: tamari for gluten-free or coconut aminos
- 1 tablespoon apple cider vinegar – Substitute: rice vinegar or lemon juice
- 1 teaspoon fresh ginger, grated (optional but recommended)
- ¼ teaspoon red pepper flakes (optional, for a kick)
- 1 tablespoon cornstarch mixed with 2 tablespoons water (for thickening)
Garnish:
- Fresh parsley or green onions, chopped
- Sesame seeds (optional)
The beauty of this recipe lies in its flexibility—each ingredient can be adjusted to suit your taste preferences or dietary restrictions without compromising the dish’s signature sweet and savory profile.
How Long Does It Take to Make Honey Garlic Chicken Breasts?
Preparation Time: 10 minutes
Cooking Time: 20 minutes
Total Time: 30 minutes
Servings: 4
This recipe takes just 30 minutes from start to finish, which is approximately 40% faster than traditional baked chicken breast recipes. The quick stovetop method ensures you get a perfectly cooked, juicy result without heating up your entire kitchen. It’s ideal for busy weeknights when you need a wholesome meal on the table fast.
How to Cook Honey Garlic Chicken Breasts in 7 Easy Steps
Step 1: Prepare the Chicken Breasts
Start by patting the chicken breasts completely dry with paper towels—this crucial step ensures proper browning and prevents steaming. If your chicken breasts are thick and uneven, pound them to an even ¾-inch thickness using a meat mallet. This ensures uniform cooking and prevents the dreaded dry exterior with undercooked center. Season both sides generously with salt, pepper, and garlic powder, letting the chicken rest at room temperature for 5-10 minutes to allow the seasonings to penetrate.
Pro Tip: Even thickness is the secret to perfectly cooked chicken—aim for uniform pieces that cook at the same rate.
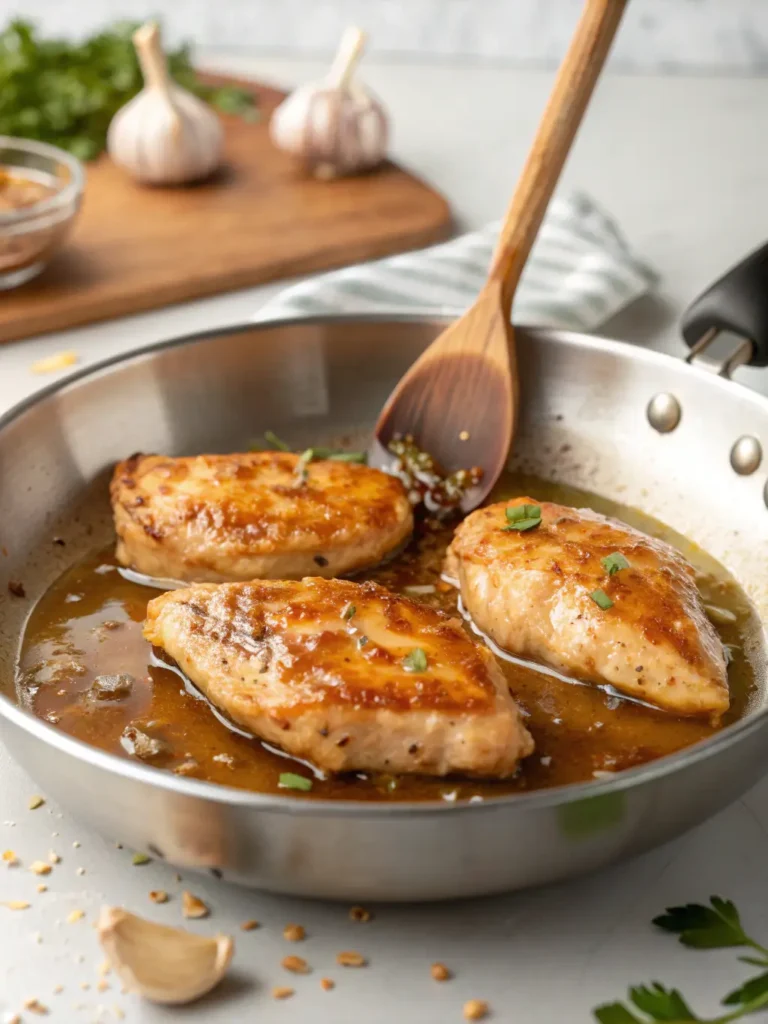
Step 2: Sear the Chicken
Heat 2 tablespoons of olive oil in a large skillet over medium-high heat until it shimmers. Carefully place the chicken breasts in the pan, leaving space between each piece to ensure proper searing rather than steaming. Cook undisturbed for 5-6 minutes until a golden-brown crust forms on the bottom. Flip and cook for another 5-6 minutes until the internal temperature reaches 165°F when checked with a meat thermometer.
Pro Tip: Resist the urge to move the chicken around—letting it sit undisturbed creates that beautiful caramelized crust that locks in juices.
Step 3: Prepare the Honey Garlic Sauce
While the chicken cooks, whisk together honey, minced garlic, soy sauce, apple cider vinegar, ginger, and red pepper flakes in a small bowl. This aromatic blend combines umami-rich soy sauce with sweet honey and tangy vinegar for a perfectly balanced glaze. The cornstarch slurry will be added later to create that signature glossy, restaurant-quality coating.
Pro Tip: Use fresh garlic rather than pre-minced for the most robust, aromatic flavor that truly shines in this simple sauce.
Step 4: Remove and Rest the Chicken
Once the chicken reaches 165°F, transfer it to a clean plate and tent loosely with aluminum foil. This resting period (about 5 minutes) allows the juices to redistribute throughout the meat, ensuring every bite is moist and tender. Don’t skip this step—cutting into the chicken immediately causes those precious juices to run out onto your cutting board instead of staying in the meat.
Pro Tip: The chicken will continue cooking slightly as it rests due to carryover heat, so removing it right at 165°F prevents overcooking.
Step 5: Make the Glaze
Using the same skillet (don’t wipe it clean—those browned bits add flavor!), reduce heat to medium and pour in your honey garlic sauce mixture. Let it bubble and simmer for 2-3 minutes, stirring occasionally to incorporate all the flavorful fond from the pan. Add the cornstarch slurry and whisk continuously for 1-2 minutes until the sauce thickens to a syrupy consistency that coats the back of a spoon.
Pro Tip: Watch the sauce carefully once it starts thickening—it can go from perfect to overly thick very quickly.
Step 6: Combine Chicken with Sauce
Return the rested chicken breasts to the skillet, along with any accumulated juices from the plate. Spoon the glossy honey garlic glaze over each piece, turning to coat all sides completely. Let the chicken simmer in the sauce for 2-3 minutes, allowing the flavors to meld and the glaze to adhere to the meat beautifully.
Pro Tip: For extra flavor penetration, score the top of each chicken breast with shallow diagonal cuts before coating with sauce.
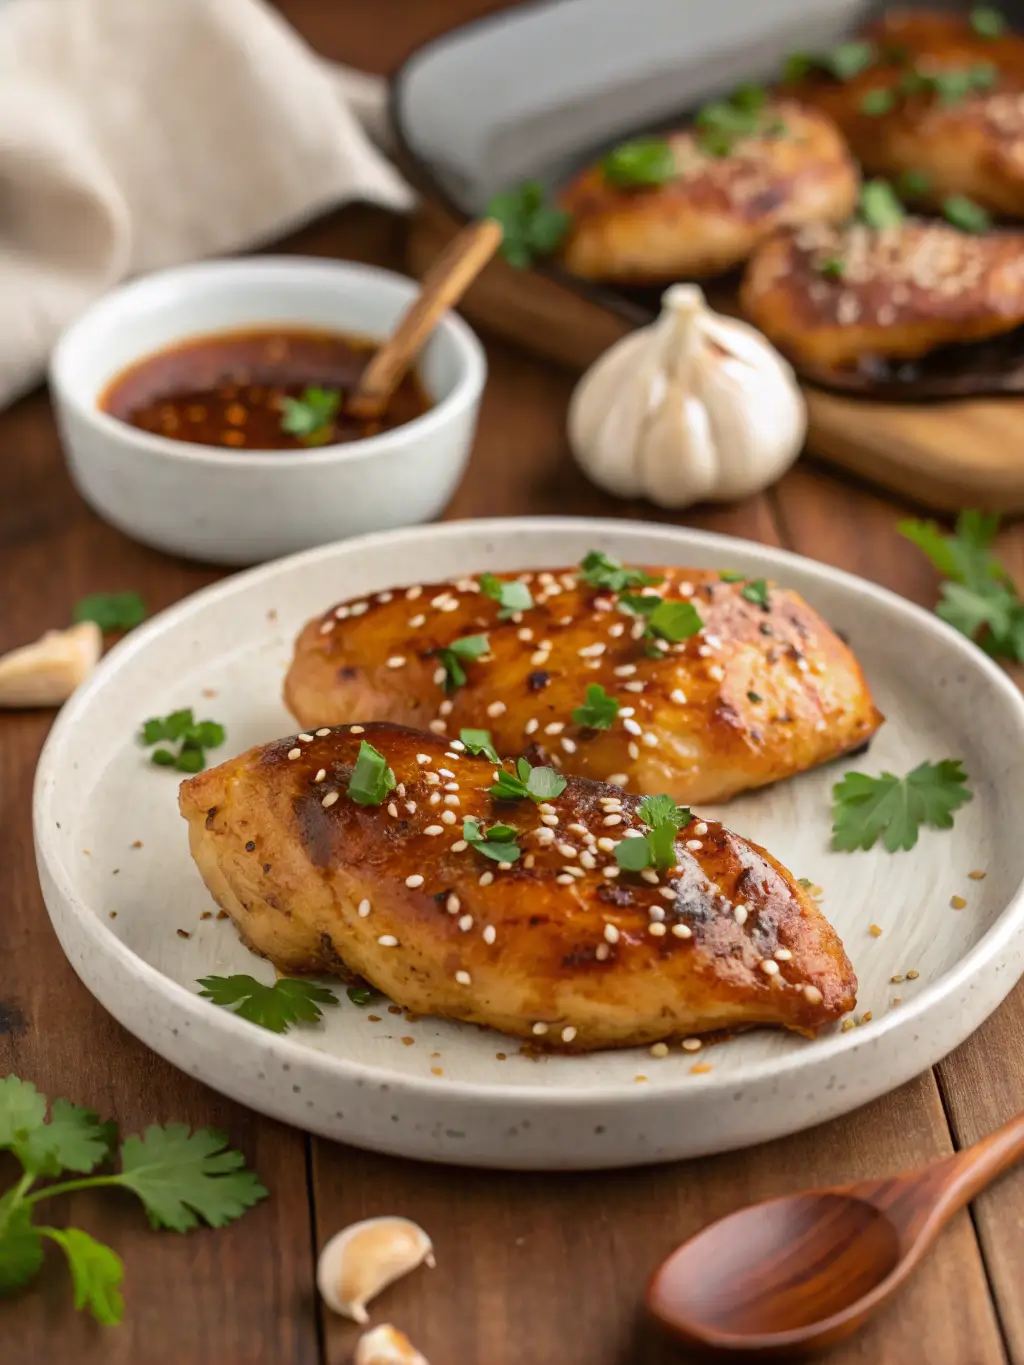
Step 7: Garnish and Serve
Transfer the glazed Honey Garlic Chicken Breasts to a serving platter and drizzle any remaining sauce over the top. Sprinkle with freshly chopped parsley or green onions and sesame seeds for a pop of color and added texture. Serve immediately while hot for the best flavor experience and that irresistible aroma that fills your kitchen.
Pro Tip: Reserve a small amount of uncooked sauce before adding the cornstarch if you prefer a thinner drizzling consistency for plating.
Honey Garlic Chicken Breasts Nutrition Facts
Per Serving (1 chicken breast with sauce):
- Calories: 285
- Protein: 38g
- Carbohydrates: 18g
- Sugars: 15g
- Fat: 6g
- Saturated Fat: 1g
- Cholesterol: 98mg
- Sodium: 620mg
- Fiber: 0g
This recipe provides an excellent protein-to-calorie ratio, with each serving delivering 38 grams of lean protein to support muscle maintenance and satiety. The moderate carbohydrate content comes primarily from the honey, providing quick energy without excessive sugar. At only 285 calories per serving, this dish fits easily into various dietary plans while delivering maximum flavor. The sodium content is moderate but can be reduced by using low-sodium soy sauce or coconut aminos.
Healthier Alternatives for Honey Garlic Chicken Breasts
Reduce Sugar: Cut the honey to ¼ cup and add an extra tablespoon of vinegar to maintain the tangy-sweet balance while reducing sugar by 33%.
Increase Protein: Use chicken thighs instead of breasts for an extra 5g of protein per serving, plus they’re more forgiving and harder to overcook.
Lower Sodium: Swap regular soy sauce for low-sodium versions (reduces sodium by 40%) or use coconut aminos for a soy-free, lower-sodium alternative.
Add Vegetables: Toss in bell peppers, snap peas, or broccoli florets during the last 5 minutes of cooking to increase fiber and nutrients without adding significant calories.
Whole Grains: Serve over cauliflower rice instead of white rice to save 150 calories per serving while adding fiber and vitamins.
Keto-Friendly: Replace honey with a sugar-free sweetener like monk fruit or erythritol to create a low-carb version with only 3g net carbs per serving.
Best Side Dishes to Serve with Honey Garlic Chicken Breasts
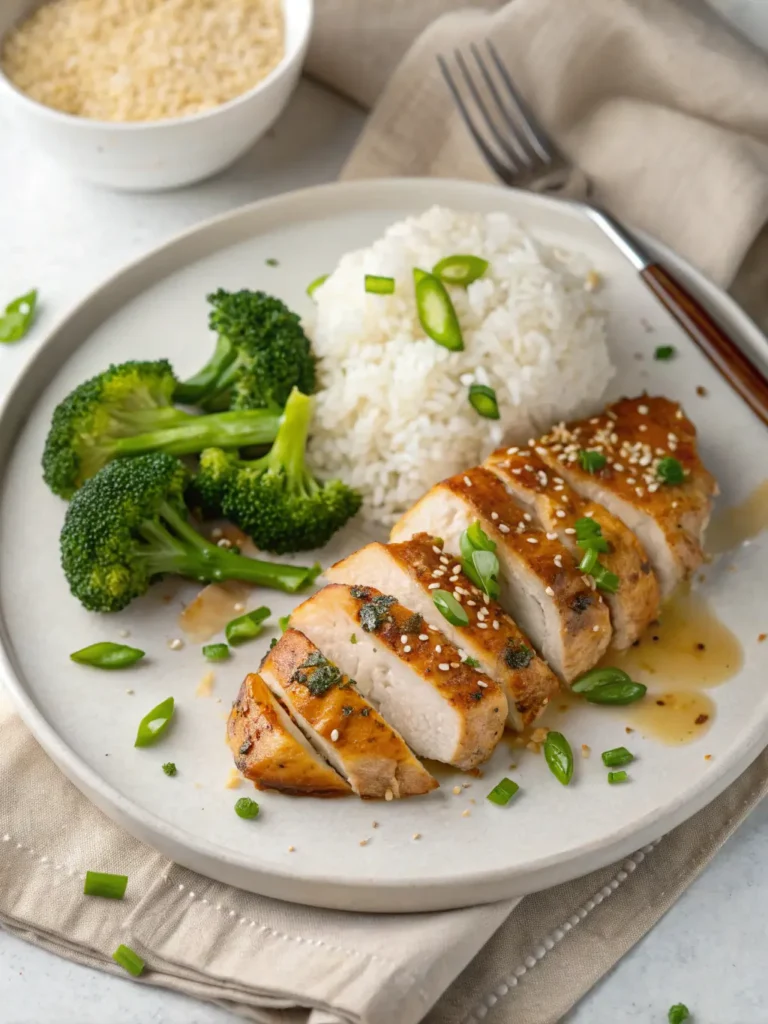
These succulent Honey Garlic Chicken Breasts pair beautifully with a variety of sides to create a complete, balanced meal:
Classic Pairings:
- Steamed jasmine rice or quinoa – The fluffy grains soak up the extra glaze perfectly
- Roasted vegetables – Try asparagus, Brussels sprouts, or carrots roasted with olive oil
- Garlic mashed potatoes – Creamy and comforting, complementing the chicken’s savory notes
Lighter Options:
- Mixed green salad with a citrus vinaigrette to cut through the sweetness
- Cauliflower rice for a low-carb alternative that doesn’t skimp on satisfaction
- Zucchini noodles tossed with sesame oil and a sprinkle of sesame seeds
Creative Twists:
- Slice the chicken and serve over Asian-style slaw for a refreshing main-dish salad
- Dice and use as a grain bowl topping with edamame, cucumber, and avocado
- Shred and stuff into lettuce wraps with pickled vegetables for a fun, interactive meal
- Serve alongside coconut rice infused with lime zest for tropical flair
Meal Prep Idea: Cook a double batch and portion with different sides throughout the week—the chicken stays moist and flavorful for up to 4 days refrigerated.
Common Mistakes to Avoid When Making Honey Garlic Chicken Breasts
Overcooking the Chicken: The most frequent error home cooks make is cooking chicken breasts past 165°F, resulting in dry, tough meat. Invest in a reliable instant-read thermometer and remove the chicken promptly when it reaches temperature—it will continue cooking as it rests.
Skipping the Searing Step: Some cooks try to skip directly to the sauce, missing out on the crucial Maillard reaction that creates complex flavors and appealing color. That golden-brown crust isn’t just pretty—it adds depth and locks in moisture.
Using Cold Chicken: Placing refrigerator-cold chicken into a hot pan causes uneven cooking and tough exteriors. Let chicken sit at room temperature for 10-15 minutes before cooking for even results.
Making the Sauce Too Thick: Adding too much cornstarch creates a gloppy, paste-like consistency rather than a glossy glaze. Start with the recommended amount and add more gradually if needed—you can always thicken, but you can’t thin without diluting flavor.
Crowding the Pan: Placing too many chicken breasts in the skillet lowers the temperature and causes steaming instead of searing. Cook in batches if necessary to maintain proper heat.
Burning the Garlic: Garlic burns quickly and turns bitter. Add it to the sauce mixture rather than cooking it alone in the pan, and keep the heat at medium when simmering the glaze.
Not Resting the Meat: Cutting into chicken immediately after cooking releases all the juices onto your plate instead of keeping them in the meat where they belong.
How to Store and Reheat Honey Garlic Chicken Breasts
Refrigeration: Store cooled Honey Garlic Chicken Breasts in an airtight container in the refrigerator for up to 4 days. Keep the chicken and sauce together to prevent the meat from drying out. When reheating, add a tablespoon of water or chicken broth to the pan to restore moisture and prevent the glaze from becoming too thick or sticky.
Freezing: These chicken breasts freeze beautifully for up to 3 months. Cool completely before placing in freezer-safe containers or heavy-duty freezer bags, removing as much air as possible. Label with the date and contents. To freeze individual portions, place parchment paper between each chicken breast for easy separation.
Thawing: Transfer frozen chicken to the refrigerator 24 hours before you plan to eat it for safe, even thawing. For faster results, place the sealed container in a bowl of cold water, changing the water every 30 minutes until thawed (approximately 2 hours).
Reheating: Stovetop (best method): Add chicken and sauce to a skillet with 2 tablespoons of water or broth over medium heat. Cover and heat for 5-7 minutes, turning once, until warmed through.
Microwave: Place chicken in a microwave-safe dish, cover with a damp paper towel, and heat in 30-second intervals until hot, adding a splash of water if needed.
Oven: Reheat at 350°F for 15-20 minutes, covered with foil to prevent drying out.
Meal Prep Strategy: Cook chicken breasts and store the sauce separately. Combine just before serving to maintain the best texture and prevent the chicken from absorbing too much liquid during storage.
Why Honey Garlic Chicken Breasts Are a Family Favorite
This Honey Garlic Chicken Breasts recipe proves that impressive, restaurant-quality meals don’t require complicated techniques or exotic ingredients. In just 30 minutes, you can create juicy, flavorful chicken with a glossy glaze that rivals your favorite takeout. The balanced combination of sweet honey, savory garlic, and umami-rich soy sauce transforms simple chicken breasts into a dish your family will request on repeat.
Ready to make dinner exciting again? Try this recipe tonight and discover how easy it is to create juicy, flavorful chicken that never disappoints. Share your results and any creative variations in the comments below—we love hearing how you make this recipe your own! Don’t forget to subscribe to our blog for more quick, delicious recipes that make weeknight cooking a breeze. Happy cooking!
Frequently Asked Questions About Honey Garlic Chicken Breasts
Q: Can I use chicken thighs instead of breasts?
A: Absolutely! Chicken thighs work wonderfully and are actually more forgiving since they contain more fat and stay juicier. Adjust cooking time to 7-8 minutes per side and ensure they reach 175°F internal temperature.
Q: Is there a way to make this recipe in the oven?
A: Yes! Sear the chicken on the stovetop first, then transfer to a 375°F oven for 15-20 minutes. Prepare the sauce separately, thicken it, then pour over the baked chicken before serving.
Q: Can I make this gluten-free?
A: Definitely. Simply substitute tamari or coconut aminos for the soy sauce, and ensure your cornstarch is certified gluten-free. All other ingredients are naturally gluten-free.
Q: Why is my sauce too runny?
A: The cornstarch slurry needs to be mixed thoroughly and added while the sauce is actively simmering. Make sure to cook it for the full 1-2 minutes after adding to allow it to thicken properly. If still thin, mix an additional ½ teaspoon cornstarch with 1 teaspoon water and add gradually.
Q: Can I prepare this recipe ahead of time?
A: You can prep the chicken (season and refrigerate) and mix the sauce ingredients up to 24 hours ahead. However, for best results, cook the chicken fresh when you’re ready to serve. Alternatively, cook completely and reheat using the methods described in the storing section.
Q: What if I don’t have fresh garlic?
A: While fresh garlic provides the best flavor, you can use ¾ teaspoon garlic powder in the sauce in a pinch. The flavor will be slightly less robust but still delicious.
Q: How do I know when the chicken is perfectly done?
A: Use an instant-read thermometer inserted into the thickest part of the breast. It should read exactly 165°F. The chicken will look opaque throughout with clear (not pink) juices. When you press it, the meat should feel firm but still have a slight spring.
Q: Can I double this recipe?
A: Yes! Double all ingredients and cook the chicken in batches to avoid overcrowding the pan. The sauce can be made in full quantity in one batch. This is perfect for meal prep or feeding a larger family.